How to extend the AEM CIF Venia reference storefront with a custom React component, build it with Webpack, and deploy it to a local AEM instance.
Background
The AEM CIF Guides Venia project is Adobe’s reference storefront for integrating AEM (Adobe Experience Manager) with Magento/Adobe Commerce via the Commerce Integration Framework (CIF). It uses a React-based frontend built on top of Magento’s Peregrine and Venia UI libraries, bundled as AEM clientlibs via Webpack.
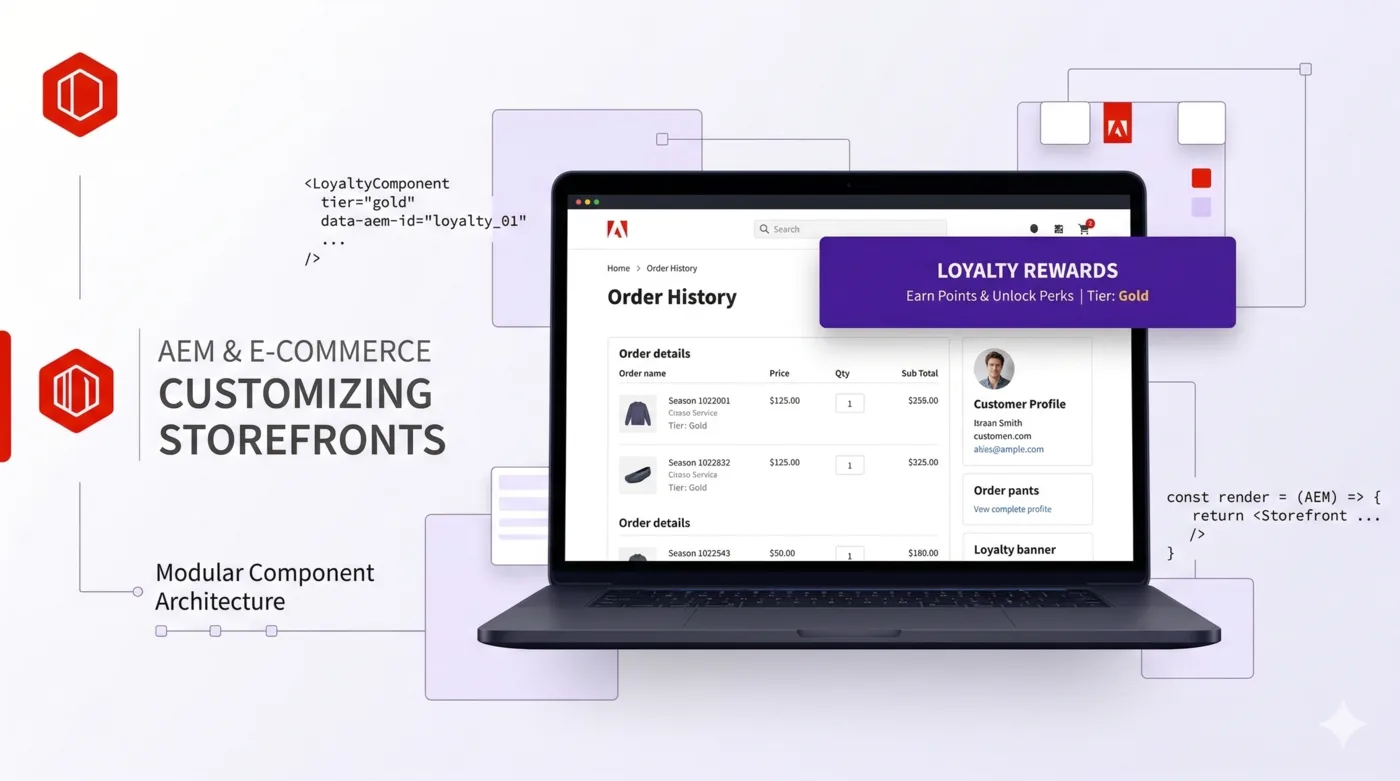
In this article we walk through adding a “Loyalty Club” banner to the Order History page – a common real-world scenario where marketing wants to surface a promotion inside a customer’s account area. The process covers the full development loop: branching, component creation, build, and deployment.
Prerequisites
- AEM 6.5 or AEM as a Cloud Service SDK running locally on
localhost:4502 - The Venia reference storefront project cloned and deployed
- A Magento 2.4.x backend with GraphQL enabled
- Node.js 16.x (the project’s Webpack 4 and sass-loader 7 toolchain requires it)
- Maven 3.6+
- Java 11
Project Structure
Understanding the project layout is essential before making changes:
aem-cif-guides-venia/
  ui.frontend/          # React source code, Webpack config, npm build
    src/main/
      components/       # React components (what we edit)
      site/             # Entry point (main.js), SCSS
    dist/               # Webpack output (not versioned)
    webpack.common.js   # Webpack config
    package.json
  ui.apps/              # AEM components, clientlibs, templates
    src/main/content/jcr_root/apps/venia/
      clientlibs/       # Built JS/CSS land here after npm run prod
      components/       # AEM HTL components
  ui.content/           # AEM page content, experience fragments
    src/main/content/jcr_root/content/venia/
      us/en/my-account/order-history/   # The page we're targeting
  core/                 # Java OSGi bundles (Sling Models, servlets)
  all/                  # Aggregate content package for deployment
What gets versioned in git: Everything under src/ directories, pom.xml files, Webpack configs, package.json. The .gitignore already excludes node_modules/, target/, dist/, and build/.
Build flow:
ui.frontend/src/ --[webpack]--> ui.frontend/dist/ --[clientlib]--> ui.apps/clientlibs/The clientlib step (via aem-clientlib-generator) copies the Webpack output into ui.apps in the format AEM expects, complete with js.txt and css.txt manifest files.
Step 1: Create a Feature Branch
cd aem-cif-guides-venia
git checkout -b feature/loyalty-club-banner
Step 2: Create the LoyaltyBanner Component
The Order History page lives at:
ui.frontend/src/main/components/OrderHistoryPage/
  orderHistoryPage.js   # Main page component
  orderRow.js           # Individual order row
  OrderDetails/         # Order detail expansion
  index.js              # Barrel export
We create a new LoyaltyBanner subdirectory following the same conventions as existing components.
LoyaltyBanner/loyaltyBanner.css
.root {
    margin-top: 24px;
    padding: 20px;
    background-color: #f5f0ff;
    border-radius: 8px;
    border: 1px solid #7c3aed;
}

.heading {
    margin: 0 0 8px;
    font-size: 18px;
    color: #5b21b6;
}

.description {
    margin: 0;
    font-size: 14px;
    color: #374151;
}

.link {
    color: #7c3aed;
    font-weight: 600;
    text-decoration: underline;
}

.link:hover {
    color: #5b21b6;
}
The CSS file uses CSS Modules – Webpack is configured to scope class names with the pattern cmp-Venia[folder]__[name]__[local], so .root becomes something like cmp-VeniaLoyaltyBanner__loyaltyBanner__root at runtime. No global style collisions.
LoyaltyBanner/loyaltyBanner.js
import React from 'react';
import { FormattedMessage } from 'react-intl';
import { useStyle } from '@magento/venia-ui/lib/classify';
import defaultClasses from './loyaltyBanner.css';

const LoyaltyBanner = props => {
    const classes = useStyle(defaultClasses, props.classes);

    return (
        <div className={classes.root}>
            <h3 className={classes.heading}>
                <FormattedMessage
                    id="loyaltyBanner.heading"
                    defaultMessage="Loyalty Club"
                />
            </h3>
            <p className={classes.description}>
                <FormattedMessage
                    id="loyaltyBanner.description"
                    defaultMessage="Join our loyalty program and earn points on every order! "
                />
                <a className={classes.link} href="/content/venia/us/en/loyalty">
                    <FormattedMessage
                        id="loyaltyBanner.learnMore"
                        defaultMessage="Learn more"
                    />
                </a>
            </p>
        </div>
    );
};

export default LoyaltyBanner;
Key patterns used here:
useStylefrom Venia UI merges default CSS classes with any overrides passed via props, enabling style customization from parent componentsFormattedMessagefromreact-intlmakes the text translatable. Theidvalues are automatically extracted during the build (npm run i18n:extract-compile) intoi18n/en.json- Props-based
classesoverride is standard Venia convention, allowing consumers to restyle without forking
LoyaltyBanner/index.js
export { default } from './loyaltyBanner';Step 3: Wire It Into the Order History Page
Edit orderHistoryPage.js to import and render the banner:
 import OrderRow from './orderRow';
 import ResetButton from '@magento/venia-ui/lib/components/OrderHistoryPage/resetButton';
+import LoyaltyBanner from './LoyaltyBanner';
Then in the JSX return, add <LoyaltyBanner /> between the order list and the “Load More” button:
                 {pageContents}
+                <LoyaltyBanner />
                 {loadMoreButton}
That’s the entire code change. Three new files and two lines modified.
Step 4: Build
Node.js Version
This project requires Node.js 16.x. The Webpack 4 toolchain uses node-sass (native bindings) and older OpenSSL APIs that are not compatible with Node 18+.
If you’re on a newer Node version, use a version manager:
# Using Homebrew (macOS)
brew install node@16
PATH="/opt/homebrew/opt/node@16/bin:$PATH" npm run prod

# Using nvm
nvm use 16
npm run prod

# Using volta
volta pin node@16
npm run prod
Replacing node-sass with Dart Sass (Recommended)
If node-sass fails to build on your platform (common on Apple Silicon), replace it with sass (Dart Sass), which is a pure JavaScript implementation:
npm uninstall node-sass
npm install [email protected] --save-dev --legacy-peer-deps
Then tell sass-loader to use it in webpack.common.js:
 {
     loader: 'sass-loader',
     options: {
+        implementation: require('sass'),
         url: false
     }
 },
Run the Build
cd ui.frontend
NODE_OPTIONS=--openssl-legacy-provider npm run prod
The NODE_OPTIONS=--openssl-legacy-provider flag is needed if your Node.js version uses OpenSSL 3.x (Node 16.17+).
The build does three things:
- Extract and compile i18n strings – scans all
FormattedMessageandformatMessagecalls, generatesi18n/en.json - Webpack production build – bundles JS, processes CSS Modules, splits chunks
- Clientlib generation – copies output from
dist/intoui.apps/src/main/content/jcr_root/apps/venia/clientlibs/clientlib-site/
A successful build ends with lines like:
copy: clientlib-site/site.js → .../clientlibs/clientlib-site/js/site.js
copy: clientlib-site/styles.css → .../clientlibs/clientlib-site/css/styles.css
Step 5: Deploy to AEM
The Maven build packages ui.apps (which now contains the updated clientlib) into an AEM content package and installs it via the CRX Package Manager API:
cd aem-cif-guides-venia
mvn clean install -pl ui.apps -am -PautoInstallPackage -DskipTests
Flags explained:
| Flag | Purpose |
|---|---|
-pl ui.apps | Build only the ui.apps module |
-am | Also make (build) dependencies (core, ui.frontend) |
-PautoInstallPackage | Activate the profile that POSTs the package to localhost:4502 |
-DskipTests | Skip unit tests for faster iteration |
The autoInstallPackage profile is defined in the root pom.xml and defaults to http://localhost:4502 with credentials admin:admin.
After deployment, hard-refresh the page (Cmd+Shift+R):
http://localhost:4502/content/venia/us/en/my-account/order-history.htmlStep 6: Commit
git add ui.frontend/src/main/components/OrderHistoryPage/LoyaltyBanner/
git add ui.frontend/src/main/components/OrderHistoryPage/orderHistoryPage.js
git add ui.frontend/webpack.common.js
git add ui.frontend/package.json ui.frontend/package-lock.json
git add ui.frontend/i18n/en.json

git commit -m "Add loyalty club banner to order history page

Introduce LoyaltyBanner React component rendered below the order list
on the my-account order history page. Uses CSS Modules and react-intl
for styling and i18n. Also migrates from node-sass to dart sass for
Apple Silicon compatibility."
Note that we do not commit ui.apps/clientlibs/ build output, node_modules/, dist/, or target/ – these are all regenerated during CI/CD builds.
Alternative Approaches
Content-Driven (Experience Fragment)
Instead of hardcoding the banner in React, you can add it as AEM-authored content in the page’s .content.xml:
<loyalty_banner
    jcr:primaryType="nt:unstructured"
    sling:resourceType="core/wcm/components/text/v2/text"
    text="<h3>Loyalty Club</h3><p>Join our loyalty program!</p>"
    textIsRich="true"/>
Note: In the actual .content.xml file, the angle brackets inside the text attribute value must be XML-escaped (< and >). The unescaped version is shown here for readability.
Or reference an Experience Fragment. This lets content authors update the message without a code deployment. Best for production; the React approach is faster for a POC.
Hybrid: React Component That Fetches a Content Fragment
For maximum flexibility, create a React component that fetches an AEM Content Fragment via the AEM Content Fragment API and renders it. This gives you React’s component model with AEM’s authoring flexibility.
Summary
The development loop for customizing the AEM Venia storefront is:
Branch → Edit React in ui.frontend/src → npm run prod → mvn install → Verify → CommitThe key insight is that ui.frontend is a standard React/Webpack project that happens to output its build artifacts as AEM clientlibs. If you know React, you already know how to build CIF components – the AEM-specific parts are just packaging and deployment.