Introduction
Documenting a Magento 2 module with clarity and structure is crucial for both human readers and AI systems. Well-structured documentation not only helps developers and non-technical stakeholders understand the module, but it also allows Large Language Models (LLMs) to parse the content and answer questions effectively. This guide outlines best practices for creating comprehensive, LLM-ingestible documentation for a Magento 2 module. We cover the key sections your module docs should include (overview, installation, APIs, extension points, data models, etc.) and how to format them for clarity. We also discuss formatting tips, metadata tagging, and automation tools (PHPDoc, Swagger, etc.) that can semi-automate documentation creation. The goal is to produce modular, structured documentation that an LLM (or any documentation engine) can easily index and use to answer questions from project managers, clients, junior developers, or QA engineers.
Best Practices for LLM-Friendly Documentation
When writing module documentation, keep in mind a few overarching principles to ensure the content is easily digestible by both people and AI:
- Use a Clear Hierarchy: Organize content with a logical heading structure. Each major topic should have its own section, with subheadings for finer details. LLMs excel at navigating structured content, and a clear hierarchy of headings and subheadings helps the model understand relationships between sections. Use semantic headings (e.g. H1 for the title, H2 for primary sections, H3 for subsections) consistently across the documentation. This structured “tree” of content provides context to an LLM about how topics are related.
- Keep Sections Modular and Focused: Each section of the document should address a specific aspect of the module (for example, installation, or public APIs) and be relatively self-contained. This modularity allows an LLM to isolate the relevant chunk when answering a question. Avoid overly long, monolithic sections—split them into smaller subsections if needed (3-5 paragraphs at most before a new heading) to maintain clarity.
- Write in Clear, Simple Language: Since non-technical stakeholders may read this documentation, explain concepts in straightforward terms and avoid unnecessary jargon. If you must use Magento-specific terms or acronyms (e.g. DI, EAV, etc.), define them clearly when they first appear. Providing definitions for acronyms and specialized terms improves LLM comprehension and ensures that even junior team members or clients can follow along.
- Short Paragraphs & Bullet Points: For readability, use short paragraphs (roughly 3-5 sentences each). Break out lists of items, steps, or features into bullet points or numbered lists where appropriate. Lists are easier to scan and for an LLM to extract as direct answers. For example, list configuration steps or a series of features rather than burying them in a long paragraph. This formatting makes it easy for both humans and AI to parse key points.
- Include Code Fences and Examples: Wherever applicable (especially in API usage or extension points), include code examples in fenced code blocks. Accompany each code snippet with a brief description above it explaining its purpose or context. You can also include comments inside the code for clarity. Self-contained examples (with necessary context like import statements or class references) are ideal, as they give concrete use-cases and allow an LLM to see how the module’s APIs or features are used in practice. For instance:
- Format Troubleshooting as Q&A: Provide a troubleshooting or FAQ section structured as explicit Q&A pairs. For example, use a format like Q: “Why is feature X not working?” followed by A: “Ensure that Y is configured…”. This format directly mirrors the way users ask questions and helps the LLM identify relevant answers quickly. In fact, well-structured FAQs are often among the most frequently used sources in LLM answers. By anticipating common questions (from clients or QA) and answering them succinctly, you create a ready reference that an AI can draw from.
- Avoid Info in Images Only: If you include screenshots (for admin UI, etc.), always accompany them with descriptive text. LLMs primarily parse text, not images. So, if you show a screenshot of a configuration screen, describe what the settings mean in text below it. This ensures no critical info is lost to an AI that cannot interpret the image.
- Use Standard Formats and Metadata: Consider providing parts of your documentation in structured, machine-readable formats when possible. For example, if your module offers REST APIs, publish an OpenAPI/Swagger specification for those endpoints. OpenAPI JSON/YAML files clearly define endpoints, parameters, and responses in a structured way that custom parsers (and even LLMs) can easily navigate. Similarly, if listing data models or configuration schemas, using a structured format (JSON, XML, YAML) can help programmatically parse the info. On your documentation site or files, include rich metadata as well. For instance, in HTML docs, add meta tags (Dublin Core, OpenGraph, etc.) with the document title, module name, version, author, and description. If using Markdown files, you might include a YAML front-matter with metadata (e.g., title, module version, last updated date). This metadata provides context that can aid search and filtering when the docs are indexed. Also, ensure your headings and content use semantic HTML (e.g., <section> or <article> tags if in HTML output) to give additional structural clues to parsers. In short, treat metadata like labels that help both humans and machines understand the content’s context and purpose.
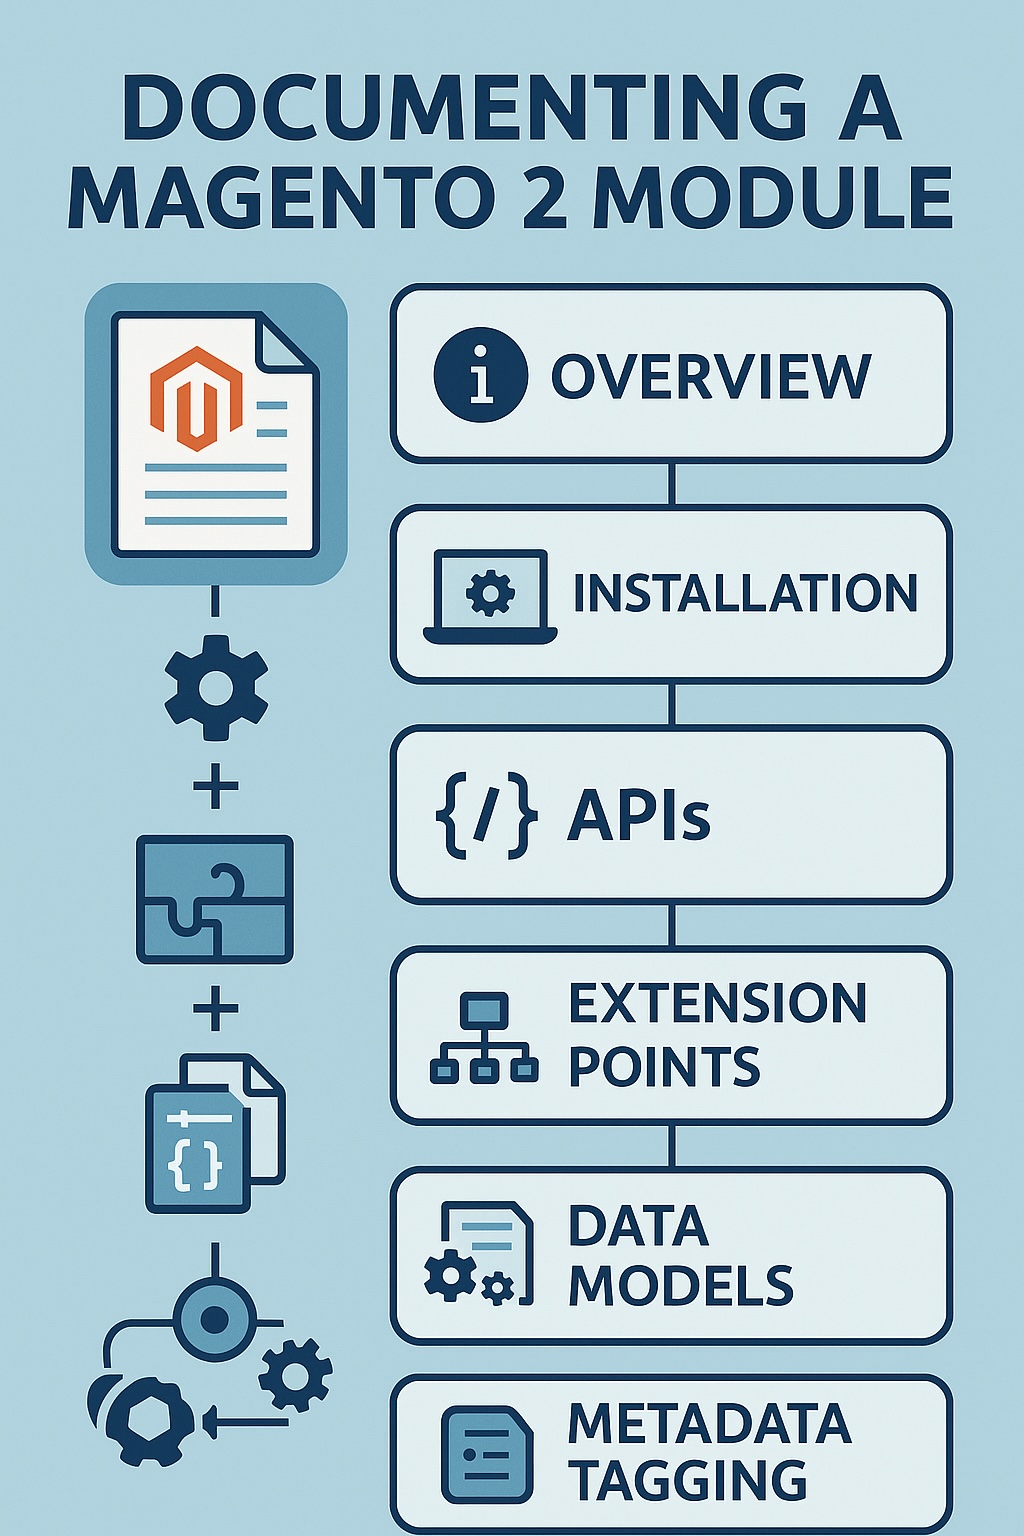
With these general guidelines in mind, let’s break down the structure of the module documentation. Each of the following sections represents a part of the documentation that should be included, along with tips on how to write and format it for maximum clarity and LLM-friendliness.
Module Overview
This section provides a high-level summary of the module, answering the questions “What is this module and what does it do?” Write the Overview in a concise, accessible way so that even a non-technical stakeholder can grasp the purpose and scope of the module. Key points to include:
- Purpose and Goals: Explain why the module exists and what business or technical problem it solves. For example, “This module adds advanced search functionality for the product catalog, allowing users to filter products by multiple attributes.” Keep the description high-level and avoid deep technical details here.
- Core Features: Bullet-list the primary features or functionalities. For instance: “Enables multi-attribute product search”, “Adds two new product listing widgets for search results”, “Provides an admin configuration for search weighting”, etc. 3-5 key features is a good rule of thumb. This gives readers (and an LLM) a quick scan of what the module offers.
- High-Level Functionality: Describe how the module works in broad strokes. Is it extending some Magento core functionality? Is it integrating with an external service? Mention the general approach (e.g., “This module observes the catalog search query and applies custom filters” or “It introduces a new checkout step for address verification”). Keep it brief—technical specifics will come in later sections.
- Audience/Usage Context: Optionally, note who is expected to use this module or which scenario it’s for. For example, “Intended for Magento store owners who need more flexible search” or “Used by developers to enable custom checkout logic”. This helps frame the context.
Structure the overview as a few short paragraphs or a mix of a short intro paragraph and a bullet list of features. Avoid going into installation or configuration details here; those have their own sections. The overview should stand alone as an abstract of the module. This helps an LLM in summarizing the module or answering “What does this module do?” directly from this section. If relevant, mention the module’s version or compatibility (e.g., “Compatible with Magento 2.4.x”). Including such metadata (version, Magento edition requirements) can be useful for filtering, and you could also include it in a front-matter or a dedicated Metadata section if desired.
(By keeping the overview general and jargon-free, you ensure that project managers or clients can understand it, and an LLM can use it to answer high-level questions.)
Installation and Configuration
In this section, document how to install the module and configure it for use. This is critical for developers and system administrators, and it’s also a common line of questioning (“How do I install X module?” or “Why isn’t X module working after installation?”). Make sure to break this into logical parts and use step-by-step lists where applicable:
- Installation Steps: If the module is installed via Composer, provide the Composer command. If it’s a manual code deployment, describe where to place the files. Then list any Magento CLI commands required (like bin/magento module:enable Your_Module, setup:upgrade, setup:di:compile, setup:static-content:deploy). Use an ordered list for sequential steps:
- Configuration Instructions: After installation, describe any setup in the Magento admin panel or config files. For example, if the module adds settings in Stores > Configuration, list them. It’s often helpful to present configuration options in a bullet list or a table. For instance:
- Permissions and Access: Note if any special permissions are needed (like API keys, cron jobs setup, file system permissions). For instance, “Ensure the web server user can write to var/<module> directory created by this module” (if applicable). Or “Cron must be running for the module’s scheduled tasks to execute (e.g., for daily index refresh).”
By detailing installation and configuration separately, you help an LLM target the right information. If a user asks “How do I configure the module to do X?”, the model can fetch from this section. Also, including common pitfalls or prerequisites (like PHP extension requirements, Magento version dependencies, etc.) here or in Troubleshooting can preempt questions. Documentation best practices for extensions emphasize providing a clear installation guide as part of the package, which ensures users and LLMs alike can set up the module correctly.
Public APIs and Usage
Every Magento module may expose some “public” interfaces – in code or services – that developers can use. This section should enumerate the module’s Public APIs and explain how to use them. Public APIs can include: PHP interfaces or classes (services, helpers, models) intended for use by other modules or custom code, any REST API endpoints the module provides, and GraphQL queries/mutations if applicable. Structure this section by the type of API:
- PHP Service Interfaces / Classes: List any important PHP classes or interfaces that form the module’s API. Typically, Magento modules mark such classes with the @api DocBlock annotation in code to signal they are stable for external use. For each service or major class, provide:
- Web REST APIs: If the module defines web API endpoints (via webapi.xml), document them here. List each endpoint’s HTTP method and URL, and what it does. For example:
- GraphQL APIs: If the module adds GraphQL support (e.g., defines new types or queries in schema.graphqls), document those similarly. List new GraphQL queries or mutations, with their purpose and an example usage. For example:
- CLI Commands: (If the module’s CLI commands are considered part of its API or usage, you might document them in a separate section, but it’s okay to mention here as well if they are an interface for developers. We have a dedicated section for CLI below, so you can just cross-reference that.)
This Public API section should essentially serve as a mini “reference manual” for developers who want to integrate or utilize your module’s functionality in custom code. By thoroughly listing classes and endpoints here, you also create content that an LLM can draw upon to answer questions like “How do I use the module’s search API?” or “Which class do I use to save an Item?” directly from the docs.
To partially automate this part: make sure your code has complete PHPDoc comments. Using a documentation generator like phpDocumentor or Doxygen can help extract this information. phpDocumentor, for example, can parse your PHPDoc comments and produce HTML or markdown API reference pages. You might generate the raw API docs and then incorporate or summarize the important parts in this section. Additionally, only include classes intended for public use – Magento’s guideline is to document and expose those marked with @api (to avoid overwhelming users with internal classes). If using phpDocumentor, you can even filter to include only @api classes in the output. This ensures the documentation (and by extension the LLM) focuses on the supported extension points.
Extension and Customization Points
Magento’s strength is in its extensibility. In this section, outline how other developers can extend or customize the behavior of your module. This is particularly useful for integrators and advanced users, and it’s a common area of questions (e.g., “Can I modify what happens when X event occurs in the module?”). Organize this by the type of extension mechanism:
- Events (Observers): List any events that the module dispatches, as well as events it listens to (observers it defines). For dispatched events, provide the event name and context:
- Plugins (Interceptors): List any plugins the module defines. Provide: the class and method being intercepted, and what the plugin does. For example:
- Layout XML and UI Components: If the module includes layout XML modifications or UI component definitions (for frontend or adminhtml), summarize them. For layout XML:
- Configuration/DI Customizations: Note any interesting points in the module’s etc/di.xml aside from plugins, such as virtual types or preferences. For example, if your module overrides a core class by di preference, document that (“This module replaces Magento\Checkout\Model\ShippingInformationManagement with its own implementation to inject address validation”). This can be critical for debugging and for other developers to know. Also mention if the module provides any extension attributes or custom API data interfaces, as those are extension points for others.
In writing this section, use subheadings or bold labels for Events, Observers, Plugins, Layout XML, etc., under the main “Extension and Customization Points” heading. This separation helps an LLM zero in on, say, events vs plugins if asked specifically. The content here will often be referred by developers asking “How can I hook into or override X in the module?”, so clarity is key.
There’s not much automation available for writing this part except systematically reviewing your module’s etc XML files and code. However, you can partially automate the gathering of this info:
- Extract events: list out events defined in events.xml (if any observers) and any $this->eventManager->dispatch(‘event_name’) calls in the code (the latter might require a text search in your code).
- Extract plugins: parse etc/di.xml for <plugin> entries or <sequence> dependencies.
- Extract layout: list files under view/frontend/layout or view/adminhtml/layout. One could write a simple script to list those definitions, but documenting what they do still needs a human explanation. Make sure the documentation of these extension points is complete and updated whenever the module changes, as this is often where integration issues arise.
Data Models and Entities
Document the data model of your module – essentially, any database entities or data structures it introduces. This section is important for developers (understanding how data is stored) and QA (understanding what data to expect), and it can help answer questions about where certain information is stored or how entities relate.
Key things to cover:
- Database Tables: If your module creates new database tables (via etc/db_schema.xml or InstallSchema scripts), list each table and describe its purpose. For example:
- EAV Attributes: If the module adds EAV attributes to existing entities (like a new product attribute or customer attribute), document those. E.g., “Adds a product attribute custom_flag (yes/no) to indicate …”. Mention attribute code, type, and how it’s used.
- Data Interfaces/Models: List any significant data model classes (especially if using Magento’s Model-ResourceModel structure). For instance:
- Relationships & Constraints: Explain how your module’s data relates to Magento data if relevant. For example, “Each Item is associated with a Magento product (foreign key to catalog_product_entity via product_id field)” or “Data is scoped per store view via the …_store table”. If there are important constraints or cascade behaviors (like “deleting a product will remove the related Item record via a foreign key constraint”), note that as well.
- Sample Data or Defaults: If the module inserts any default data (like default configurations, or if it comes with sample records), mention that. E.g., “On installation, 5 sample Item records are created for demonstration” or “The module does not create any data until an admin user adds an Item in the backend.”
This section might combine narrative and tabular presentation. The idea is to give a clear picture of the module’s data footprint. It can be semi-technical so likely more for developers/QA, but keep explanations straightforward (non-technical readers can skip details, but at least they see that the module has a well-defined data structure). From an LLM perspective, structured information like a table definition or a list of fields is easy to scan for direct questions about data. If your documentation engine supports it, you could even include an ERD diagram image; if you do, remember to describe it in text as well.
Automation tip: You can generate a lot of this info from your schema files. For example, if using db_schema.xml, you already have table and column definitions – consider writing a small script to transform that XML into a Markdown table or list for documentation. Similarly, listing out your Api/Data interfaces’ getter methods can be done via reflection or reading the interface file. This ensures the documentation stays up-to-date with the code. Nonetheless, you’ll still need to write human-friendly descriptions for each, which is where the real value lies.
Admin UI Components and Features
If the module adds anything to the Magento Admin panel (backend UI), detail it here. Non-technical stakeholders (like a merchant or PM) often care about what new screens or options appear in the admin, and QA needs to know what to test. Meanwhile, an LLM can use this section to answer questions like “How do I use this module in the admin interface?” or “Where do I find the module’s settings?”.
Consider covering the following:
- Admin Menu Entries: Does the module add new menu items in the Magento backend navigation? If so, list them and their location. For example: “Adds a menu item Custom Items under Catalog. Navigating to Catalog > Custom Items > Manage Items opens the module’s grid of items.” This tells exactly where to find the module’s UI.
- Admin Pages / Screens: Describe any new pages or interfaces the module provides. Common ones include:
- Configuration UI: If the module adds a section under Stores > Configuration, you might have described options in the Configuration section already. Here you can mention how to navigate to it: “Configuration settings for this module are in Stores > Configuration > Catalog > Advanced Search (as detailed in the Configuration section above).” Cross-referencing avoids duplication.
- UI Components Tech: If your admin UI uses Magento’s UI components (knockout-based forms/grids), you don’t need to detail the technical implementation here, but focus on the functional aspect. For completeness, you could mention the files like “The admin grid is defined via view/adminhtml/ui_component/vendor_module_item_listing.xml,” but it’s usually more important to describe what the admin user sees and can do.
- Screenshots and Descriptions: Including small screenshots of the admin UI can be very helpful for human readers (e.g., a screenshot of the grid or form). If you include them, ensure you also describe the image content in text. For example: “(Screenshot of Manage Items grid showing two sample items.) The grid allows filtering by name or status, and actions include Edit or Delete on each item.” This way, an LLM still gets the information from the textual description.
Focus on how an admin user or merchant would interact with the module. This section can read like a mini user-manual for the admin UI. Keep the language accessible – this might be read directly by a client or used by an LLM to explain to a non-developer “How do I add a new Item using this module?”. Including step-by-step for a common admin task is useful (e.g., “To add a new Item: go to Catalog > Custom Items > Add New, fill out the form fields X, Y, Z, and click Save. The new Item will then appear in the grid.”).
By thoroughly documenting the admin UI, you not only help end-users, but you also give the LLM content to answer UX questions. For instance, if someone asks “Where in admin can I find the custom search settings?” the LLM can pick out the navigation path from your text.
CLI Commands
If your module provides any custom CLI commands (i.e., added to Magento’s bin/magento tool), list them in this dedicated section. Developers and DevOps engineers might ask about CLI usage, and including this info makes it straightforward for an LLM to respond.
For each CLI command, document:
- Command Name: (in backticks) e.g. bin/magento vendor:module:reindex.
- Description: A one-line summary of what it does (e.g., “Reindexes the custom Item data for search optimization”).
- Usage Details: Explain any arguments or options. If the command accepts arguments, show the syntax. For example: bin/magento vendor:module:export <filename> [–format=json] – Exports all Items to the specified file.
- Example: Provide a concrete example usage in a code block, and possibly the expected output. For example:
Format each command as a sub-bullet or a small subsection if you have multiple. If there’s only one significant command, you can format it as a short paragraph or bullet. Ensure that the description is clear enough that someone not deeply familiar with Magento CLI can understand when and why to use it (e.g., “run this if the custom data appears out-of-sync or after bulk importing items”).
From an LLM perspective, listing CLI commands in this structured way means if a question is asked like “Is there a CLI command to reindex the module’s data?” the answer can be pulled verbatim from here. The backtick formatting and explanation also reduce ambiguity.
For maintainers, note that you can auto-generate some of this by introspecting your console command classes (which extend Symfony\Component\Console\Command\Command). But since most modules only have a couple of commands, manual documentation is usually fine. Just remember to update this section if command names or options change in future versions.
Integration with Other Magento Modules
Use this section to describe how your module interacts with or depends on other modules. This is important for understanding the module’s context in the larger Magento system and is often relevant to architects or developers doing complex customizations. It’s also useful for troubleshooting (e.g., conflicts or sequence issues). Points to include:
- Module Dependencies: List any Magento core modules or third-party modules that your module requires. You can get this from your module’s composer.json (the require section) or module.xml (the <sequence> dependencies). For example: “Dependencies: This module depends on Magento_Catalog (for product data) and Magento_Search. It also uses Magento_Framework APIs extensively.” If it’s a third-party integration, mention that (e.g., “Requires the Algolia search module to be installed, as it extends Algolia’s indexing”). These dependencies might also be automatically enforced via Composer, but explicitly documenting them is helpful for awareness.
- Interactions and Overrides: Explain any non-trivial interactions with other modules:
- Compatibility and Known Conflicts: If known, note any known conflicts or special compatibility considerations with other extensions. For instance, “Incompatible with Module X version < 1.3 due to overlapping functionality in search. Use version 1.3 or higher of Module X.” Or “Tested with Magento versions 2.4.2 through 2.4.5. Not guaranteed to work on 2.3.x.” Such notes might overlap with Known Limitations later, but here specifically talk about other modules or Magento versions.
This section can be relatively short, but it provides context that can preempt integration issues. It’s valuable for an LLM to answer questions like “What does this module require to work?” or “Will this module affect my catalog module behavior?”. By listing dependencies and integration points clearly, the LLM can provide accurate answers about module compatibility.
Common Usage Scenarios
Provide a few common scenarios or workflows in which the module is used. This is somewhat a mix of tutorial and FAQ style. The idea is to illustrate typical use-cases of the module from an end-user or developer perspective, tying together various features.
Examples of scenarios:
- For an Admin User: “Configuring and Using Advanced Search:” – Walk through how a merchant would configure the feature (reference the config section) and then how it works on the storefront. E.g., “After enabling Advanced Search in configuration, the storefront product search bar will allow multi-attribute filtering. For example, a customer can search ‘shoe size:10 color:red’ to find red shoes in size 10.” This scenario explains the end-to-end flow of a feature.
- For a Developer: “Programmatically Creating an Item:” – Show how a developer might use the module’s API in code to create a new entity or perform an action. E.g., “Using the ItemRepositoryInterface, a developer can create a new Item object and save it: (provide a short code snippet). This might be useful in a script or custom controller.”
- Integration Example: If relevant, describe a scenario of integrating with another system. E.g., “Syncing with External Inventory:” – if the module had an API to push data out, describe how a user would call it or schedule it.
For each scenario, keep it structured:
- Give it a short descriptive heading or start with Scenario: Title.
- Write a step-by-step or narrative of the scenario, referencing relevant parts of the module.
- Use bullet or numbered steps if it’s a procedure. If it’s more narrative (like explaining a user story), keep paragraphs short and focused.
These usage examples serve two purposes: they help new users understand how to actually apply the module in real life, and they act as another source of truth for the LLM. If a question is phrased in a goal-oriented way (“How do I achieve X with this module?”), the LLM might pull from these scenario descriptions to formulate an answer. They often combine information from multiple sections (config, UI, API) into a cohesive story, which is exactly what a human or AI needs to solve a real problem.
Concrete examples also reduce the chance of misunderstandings. For instance, showing a sample search query or sample code means the LLM is less likely to hallucinate an incorrect method name or usage, because it has a correct example to refer to. Always ensure your examples are accurate and tested if possible.
Troubleshooting and Known Limitations
No module is perfect. This section lists known issues, limitations, and solutions to common problems. Formatting this as a troubleshooting FAQ is highly effective for both users and LLMs. Here’s how to structure it:
- Known Issues / Limitations: Bullet out any limitations of the module so users are aware. For example:
- Troubleshooting Q&A: Present common questions or problems as Q&A pairs. For example:
- Error Messages: If your module is known to log certain error messages or exceptions that users might encounter, document what they mean and how to resolve them. For example, “Error ‘Index table not found’ – occurs if the module’s setup script didn’t run. Fix: run setup:upgrade and try again.” This again can be formatted as Q&A or a bullet list of errors with explanations.
- Support and Resources: Optionally, note where users can get further help (if applicable). E.g., “Refer to the Magento logs in var/log/ for more details on errors. If issues persist, contact the module developer or check the community forum for this module.” While not directly about the module’s content, it directs users to support – but also signals to an LLM that beyond the documentation, these are the next steps (which it might incorporate into an answer about troubleshooting).
By openly listing known issues and fixes, you build trust with users and equip the LLM to handle “why isn’t X working” queries. It’s much better for the AI to have the answer “This is a known bug, do X as a workaround” from your docs than to guess or provide a generic answer. Also, keep this section updated as bugs get fixed or new issues are discovered (tie it to release notes if possible).
Note on style: As per LLM best practices, writing troubleshooting in Q&A form is highly recommended. The question should be phrased as a user would ask it, and the answer should be concise. You can even include multiple questions in one answer if related, but separating them usually yields better direct matches.
Automation Tools and Documentation Workflow
Documenting a Magento module can be time-consuming, but there are tools and strategies to semi-automate parts of the process and ensure consistency:
- PHPDoc & API Documentation Generators: As mentioned earlier, using PHPDoc comments throughout your code is essential. Tools like phpDocumentor or Doxygen can generate an HTML or markdown reference of your module’s classes, methods, and their descriptions. This is useful for the Public APIs section. You can integrate phpDocumentor in your build process to update API docs whenever code changes. Remember to focus on the public-facing classes (consider using @api annotations and filtering as Magento suggests). The generated docs can either be provided as an appendix or used to copy relevant pieces into your main documentation.
- Swagger / OpenAPI for Web APIs: Magento 2 already provides Swagger UI for its REST APIs, including those added by your module. Leverage this by ensuring your REST endpoints have good PHP interface documentation (Swagger pulls descriptions from code) and correct webapi.xml specs. You can also export the Swagger JSON for your endpoints (/rest/<store>/schema?services=<YourServiceInterfaces>) to produce an OpenAPI definition. With an OpenAPI spec, you could use tools like Swagger Codegen or ReDoc to generate API documentation pages. This structured API documentation can be fed to an LLM or used with specialized parsers for accuracy. It’s a form of metadata that complements your written docs.
- Automating Release Notes/Changelog: Keep a changelog that highlights new features, fixes, or breaking changes per version. While not directly in the scope of “module documentation content,” a changelog is useful metadata. It can be included and parsed by LLMs to answer “What changed in the latest version?” questions. Automation tip: you can generate a basic changelog from git commit history or tags (though writing human-friendly release notes is still a manual task).
- Custom Scripting for Documentation: Don’t shy away from writing small scripts to extract repetitive info:
- Documentation Frameworks: If you have multiple modules to document, consider a documentation framework or static site generator. Tools like MkDocs, Sphinx, or Docusaurus allow you to write docs in Markdown (with maybe a YAML front-matter for metadata) and generate a nice website or PDF. These also let you define a structure (sidebar, previous/next navigation) that mirrors your heading hierarchy. A well-structured docs site is not only user-friendly but can be crawled by search or AI indexing pipelines effectively. For instance, MkDocs with a Material theme supports indexing content for search (which is similar to what an LLM would do internally). Choose a system that supports multi-page or single-page docs as needed. For a smaller module, a single Markdown file (like a README) might suffice; for larger ones, break into multiple files (Overview, User Guide, Developer Guide, etc.). Just ensure consistent structure across modules so that an AI or user jumping between them doesn’t get confused.
- Metadata and Search Tags: Use tagging in your docs repo or site if possible. For example, many documentation systems allow adding tags to pages (like “magento2”, “search”, “admin-ui”). While an LLM working off raw text might not directly see these tags, if you build a vector database or search index with metadata, those tags can be used to scope queries. Even without advanced pipelines, including keywords in the content (naturally, not as spam) helps search. For example, explicitly mention synonyms: “This extension (module)…” using both words covers what a user might call it. Include Magento-specific terms so that if someone asks generically, the link is made (e.g., if your module is often referred to as “Advanced Search extension”, mention that phrase in the overview).
- Continuous Updates: Treat documentation as part of your development lifecycle. Whenever the code changes in a way that affects usage (new feature, changed config, different behavior), update the docs accordingly. This way, when an LLM is retrained on or fed your latest docs, it gets up-to-date information (avoiding outdated answers). If possible, maintain version-specific docs (even if just noting the version in the header) so that it’s clear what version of the module the documentation refers to.
- Validate with Q&A Testing: As a final step, you might “simulate” some Q&A using an LLM on your docs. Consider feeding your documentation to an internal LLM-based assistant (there are tools to do this with a local index) and ask it questions that stakeholders might ask. See if it finds the right info. If it struggles, that’s a cue that maybe some information is buried or not clearly written, and you can adjust the content or structure. This kind of proactive testing can greatly improve the usefulness of the docs for everyone.
In conclusion, well-structured, comprehensive documentation is key to making your Magento 2 module accessible to all audiences. By including all the sections above in a clear format, you cater to project managers (who get the overview and scenarios), administrators (who get installation and UI guidance), developers (who get API and extension point details), and QA/support (who get troubleshooting info). At the same time, you’re creating a resource that an LLM can ingest to provide accurate, context-aware answers about the module. Remember to use headings, lists, and consistent formatting liberally – both humans and machines appreciate it. As one set of best practices notes, proper hierarchy, segmented topics, FAQ formats, and example snippets all significantly improve an LLM’s ability to understand and respond using your docs. And finally, leverage automation where you can (PHPDoc, Swagger, etc.) to ease the maintenance burden and keep the documentation in sync with your codebase. With these practices, your Magento 2 module documentation will serve as a reliable knowledge base for any query – whether it comes from a colleague on your team or from an AI assistant in the future.